
At the point when people visit your Facebook page, it is an extraordinary chance to catch their attention and get them to pursue your newsletter. Fortunately, MailChimp makes it simple to associate your sign-up form to your Facebook page.
In order to integrate MailChimp sign up form with your Facebook page, you first need to ensure that you have administrator access to the Facebook page. The integration is set up through your own Facebook profile. After you set up the Facebook integration, you can add signup forms to Facebook Pages you manage, share new email campaigns to Facebook, and that’s just the beginning.
1. Log in / Sign into your MailChimp account.

2. Select your “Account Name” on the top right and click on “Account”.

Need Help?
Get in touch with us now!3. Click the “Integrations” tab on the account page.

4. Go to the Facebook option and select the “Log in” click button.

Post this MailChimp shall redirect you to your Facebook account. Whilst setting up the integration, it is mandatory for you to agree to approve each of Facebook’s permission requests for the integration to be executed smoothly (for its uninterrupted functioning).
5. Once you’ve gotten through into your Facebook account, select the “Continue as …” button to proceed further.

6. Select the “OK” click button to permit MailChimp to post on your Timeline.
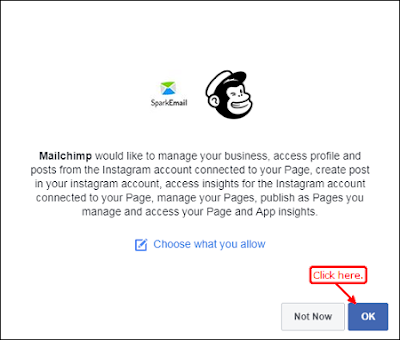
7. Click the “OK” button one more time to let MailChimp manage the pages you manage.
After this Facebook will redirect you to MailChimp, once you’ve granted access to MailChimp.
Need Help?
Get in touch with us now!8. One can also cross-check if the accounts have been connected by selecting on the “Test connection” option.

9. You can also double check if it has been linked by clicking the “Test Connection” button.

And that wraps it up, wasn’t it quick and easy? For more such simple step by step, instructional articles and blogs follow SparkEmail Design. SparkEmail publishes helpful email marketing tricks, tips, and trends. If you enjoyed what you read then you might want to consider bookmarking this page or simply sign up to our email list. We will notify you each time we update our blog with such utility content.
Reach out to us at info@sparkemaildesign.com or call on +1 (909) 689 8771.